This tutorial will show you how to create glossy white minimalistic vector button in Adobe Illustrator.
It will give you an idea of how to use Illustrators Pathfinder window tab which contains functions like substract, intersect and exclude to shape areas.
This button is created in Adobe Illustrator cs3, but you will be able to create in any version of Illustrator because it doesn have any fancy effects.

1. Dwaw an ellipse
First draw simple ellipse using ellipse tool. Hold down shift key while drawing to make it proportional.
Also fill it with gradient using Gradient Tool. Make it like in the example bellow

2. Make smaller copy
To make a little smaller copy of the circle that you draw in first step, select your first circle, go to Object/Path/Offset Path as in the example bellow.
Fill this first copy with a little darker gradient:

3. Second copy
Now make another copy using same tool, but now make it -40px smaller (tick preview to see how shape changes in the real time).
Fill it with reversed gradient (darker gray in the top and white at the bottom):

4. Third copy
Now select your last copy of circle and again make it -3px smaller.

5. Fourth copy
Now select your last copy of circle and again make it -3px smaller.
Again fill with reversed gradient (white at the top and gray at the bottom):

6. Fifth copy
Select previously created copy and again use Offset Path to make the last copy ot the circle – again -3px:

7. Fill with gradient
As in the example bellow, you should now have five circles – biggest in the back layer and smallest in the front layer. Select the smallest circle and fill it with gradient same as the second from the back:

8. Oval shape
Now on top of all circles draw oval shape like in the example bellow:

9. Two oval shapes
Make two same copies of oval shape (ctrl+c to copy, ctrl+f to paste on top). Pathfinder window can be activated in Window/Pathfinder.
Make another copy of the smallest circle in the front layer using (ctrl+c to copy, ctrl+f to paste on top). Select first oval shape and first (smallest) circle in the front layer and with both selected hit Intersect shape areas while holding shift key. Now you should have created first half circle. Here you are using oval shape to cut half of the circle.

10. Cut another circle
You should still have one oval shape left because you made the copy in the previous step. Select second form the back circle and again make a copy of it (ctrl+c to copy, ctrl+f to paste on top).
Now select both, the copy you just made and the oval shape and again hit Intersect shape areas while holding shift key.

11. Two half circles
Now you should have two half circles, you just need to fill them with correct gradient color. Select both half circles you just created and fill them with light gray to white gradient using Gradient Tool.
Select the bigger half circle and white holding ctrl press [ key to bring it back a few layers.

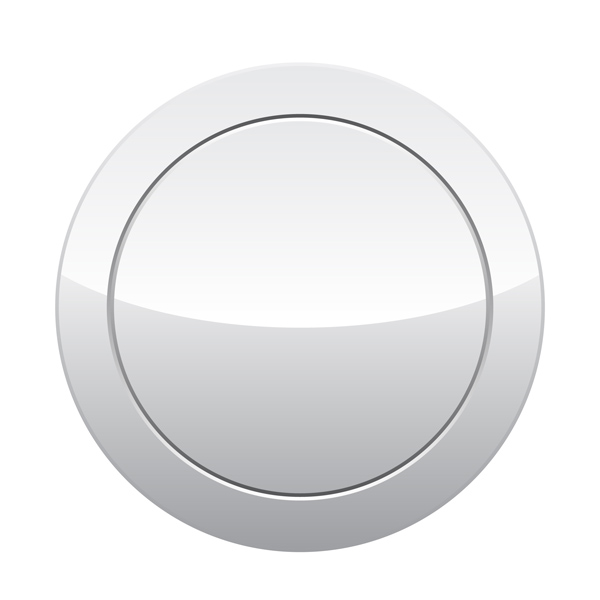
12. Final result
Experiment until you get the same as in the example bellow: